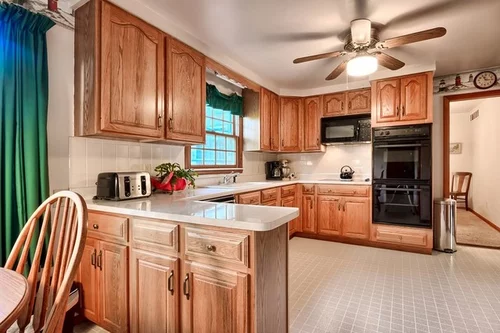
.png)
From Shame To Game - A stunning Kitchen Transformation by NEST+CO that is sure to inspire!
From dark and dated to cozy and charming...this kitchen transformation is a must-see!
(Wait till the end!)

Who else is ready to say 'good-bye' to 80's oak??
This 30 year old house had a beautiful structure and architecture, traditional yet transitional...

Unfortunately, the oak inside had taken over.

This leads the question..."is too much of a good thing...well, too much"?!
...
Answer: Yes!!
Hey, I love wood as much as the next guy (or gal!)
But, like most things in life...too much of a good thing can simply be...too much! (Except for perhaps Margaritas on a beach, a box full of puppies or winning at the casino...over and over and over and...)
Now...that would be fun!
Sigh.

Anyhoo....the greatest challenge in this project was to separate the 'muddle' from the attractive elements and to create calm and beauty in a visual chaos.
And for the love of all things holy...let's create a focal point...(or two!)
STEP ONE - PLANNING + DESIGN
LET'S START WITH THE OAK...
The kitchen cabinets were oak. The dining furniture was oak. The counter stools were oak. The baseboards were oak. The interior door openings were oak. The exterior door openings were oak. The window frames were oak. The floor in the family room beside was oak. The mantle in the family room was oak. The staircase spindles were oak. The bathroom cabinets downstairs were oak, the bathroom cabinets upstairs were oak...
...See where I am going with this!?

In some areas, there was so much going on...so much 'busy-ness'...you couldn't see the forest from the trees...or in this case the cabinets from the furniture (or the busy backslash from the clutter.)
In other areas....it simply lacked style and charm.
And it dated itself. Sooooo dated.
I decided to stay true to the traditional cabinetry to honour the overall aesthetics and styling of the home, but to try to find a way to simplify the colours...and to create calm...and to bring in charm and personality.
Firstly, I looked at ideas on #Pinterest and started to create a vision, define a style for inspiration and create an inspiration board on my computer, using #InDesign.

I knew that I loved rooms that were bold, yet simple. That used large areas of colour to create drama. That used dark walls to accentuate the beauty and richness of the wood...
But, I had already started to fall in love with the idea of a cottage-feel.

And, I started to love the idea of creating an homage to vintage...

...with a little ##boho mixed in to bring some contemporary vibes in.

My heart said that I just needed to get creative, to get my hands dirty and let the creative juices flow naturally...
So...
I Colour blocked!
I took a deep look at the entire 2-room space and discovered ways to connect the spaces, simplify the look and to control where the eye went.
Then I went shopping...
On-line shopping, that is...

STEP TWO - PAINTING
I selected a deep grey/black for the dining chairs and counter stools, an earthy dark grey for the base cabinets and pantry cabinets, a lighter grey/green for the upper cabinets in one area, and a bright white for the back splash. (Yes! We painted the back splash! Who knew...right?!)
I wanted a classic look, so a mono-chromatic colour scheme seemed like the (timeless) way to go.
With beautiful memories of the simple cottage life in Turkey Point, Ontario as a kid in the 70's, I wanted to create a more 'cottage-y' feel in this space; a nod to a simpler time, vintage and times gone by.

This is the cottage that my Grandfather built back in the mid-late 60's.

Lots of great memories at Crestwood Ave, spending the entire summer here every year...beach, swim and boat and waterski time, kids all playing in neighbourhood together...we would take off on our bikes for the morning to catch frogs and to have 'adventures' in the woods. Picnics, hiking and drinking out of the hose. Picking fresh fruit and vegetables and snapping the ends off of peas. Visits to the local Mushroom Farm, Normandale Fish Culture Station, the Turkey Point Tower and local mini-put. Checking in at the variety store for our mail...or maybe an ice cream or being treated to our favourite chocolate bar (peppermint patty or a chocolate covered cherry for me!) Times sure were different then!

Perhaps, it is the affect of Covid (and the lack of travelling), I am driven to create spaces that make me 'feel' like I am away on vaction...creating a sense of escape and mega-relaxation in the home. Spaces that feel comfy, cozy and create a big siiiigghhh...
A place to slow down, breathe, create, socialize, laugh, relax and enjoy company.
Anyways, I was more than glad for an excuse to chalk paint and play with our palm sander...distressing the cabinetry and adding the feeling of a well-loved, well-warn kitchen!
I love to chalk paint and distress! Since my Art School days at Beal Art School in London, I have loved to paint furniture and bring new life into an old piece.


So now, this 30 year old kitchen looks like it has been used and loved for many, many decades!
I chose a darker earthy grey/black for the dining chairs and counter stools and went to work painting and distressing just about every surface in the room!
DINING CHAIRS + COUNTER STOOLS:

I painted 1/3 of the table in a country white and distressed it as well....just to add some character and uniqueness to the piece.


I then pulled out my hand-dandy palm sander and went to work distressing the chairs...to add that 'well loved and well lived-in' look and feel.
After applying 3 coats and sanding, I finished off each piece with a few coats of a clear wax...
They needed to sit and cure for 2 weeks, so off to the Dominican Republic we went on a lovely holiday! (A great excuse, right?!)

Love how this paint took on a "soft-black" look, with an earthy, warm undertone!
Who wants to watch paint dry, when you can being doing this???

Back from our trip a week later...so I carried on...
I had chosen a medium grey with a green undertone for the pantry and most of the cabinets, as well as for the dining table.
DINING TABLE + PANTRY/MOST LOWER CABINETS

We liked the layout of the kitchen, so it stayed put.
I felt that it didn't need to be ripped apart, just given a bit of a face lift!
The cabinets were custom-made when the home was built, approximately 30 years ago (when oak was in all it's glory!) They are of excellent quality and the floor plan and spacing worked well...so painting seemed to be the best option...functionally and cost-wise.
*Side note: Oak is absolutely gorgeous and is still in style...just with a different look and feel...more modern and clean lines. Here is a little inspiration for you modern-lovers out there!
Now, back to the project...
Here you can see that we have started to paint the walls, the cabinets and the backsplash.
Each area only needed 2 coats...but it was a big of a juggle...while one area was drying, we tackled another area.

Working away...painting the cabinets, back splash, furniture and walls! No surface was safe!
The cabinets over the long counter wall were painted a different colour...a country grey/green.
UPPER CABINETS:

Again, I painted, sanded to distress and then applied a clear coat over the cabinets to make them easy to maintain.


STEP THREE - ORGANIZATION
Then, I focused on the function of the space, reorganizing all of the cabinets and drawers.
I added organizers for the cutlery (love this extendable bamboo organizer!)

Tray dividers for cutting boards, cookie sheets and low baking pans.

...and my fav - pull out wire shelves in the pantry!


I added 50 hand-labelled spice jars and organized them in alphabetical order! No more struggling to find the spices that you need!


I also purchased organizational bins for the pantry, to utilize the space better and to make each ingredient easy to find! I organized each pull-out by category (eg. Carbs, salty, sweet, can goods, baking, etc.)
I added a hanging gold rod to organize new wood utensils and a tea towel, or two.


STEP FOUR - LIGHTING + FINAL FINISHES
We installed new lighting.


We love the vintage pendants over the peninsula and the fabulous bo-h0 chandelier over the kitchen table. What do you think?


As soon as I discovered this wood bead and rattan chandelier,
I was in love...and new I had to have it!

Then we spray painted the range hood to match the new fridge and added sweet cart for more storage and work counter space in the centre of the prepping/cooking area.


The microwave, oven and dishwasher will be changed over to the new slate stainless steel, in time.
Now, the kitchen windows are a focal point in the room. They architecturally are quite fabulous, and were completely lost in the previous design.

I designed and we built a custom vintage-looking wall shelf to show off the new vintage-inspired plate sets, wine goblets and more. Guess what wood I bought!?
Oak! :)

Oh, the irony!
In my defence, the oak truly does have the most beautiful grain! :)
I designed the shelf style, cut piece sizes and off I sent to my local Home Depot, where I had them cut the pieces for me. Once I returned home, I stained each piece individually and then with my helper, we put it all together and hung it on the wall. We love the affect!

We designed and built the custom wall shelf and sewed custom curtains out of 100% linen, to support the old world charm. A white fur was thrown on the french-inspired bench, as well as some linen and mud cloth pillows.
We painted the walls a dark grey to blend in with the cabinetry.
And, we added an artificial finish to the door that leads out to the patio, giving it a tudor-style, older house feel.
The white back splash plays off of the beautiful light and bright counter top.


STEP FIVE - ACCESSORIZING
Bring on the charm...
We added a vintage runner, some eclectic candle holders (love the combination of antique brass, wood and glass!) and some rattan seat cushions and place mats.

With the money we saved, we were able to install pull out shelves in the pantry, as well as other cabinet organizers, custom curtains and new lighting.
The french country-inspired bench, complete with a cozy throw, a faux-fur and mud cloth pillows adds some old-world charm, as well as the authentically distressed vases.

Love these vases! All the way from Ukraine!


We found the best place to find some artificial greenery....that had the most natural look and feel.


We played with the vintage feel by adding an old-looking land line phone. (What?! Who has that anymore?!) ...As well as a vintage toaster and timer.

The phone is definitely a hit with the Grandkids! You should have seen the look on their faces when it rang...and they got to answer!

Adding some vintage elements to the space it connected the design to a #GrandmaCoastal vibe...creating a cottage-like look and feel.
We purchased an incredible new dark slate coloured, extra deep sink (complete with a cutting board, 2 draining rack options and small tray for washing veggies and perfect for defrosting frozen salmon!) and beautiful gold restaurant style taps, with an additional water filter tap and a separate soap dispenser.

We used chalk paint to transform the dated oak cabinets, dining furniture and counter stools (with a little hand sanding to distress), as well as the back splash...to create an entirely new look and feel, on a budget.
We changed the knobs and handles from a contemporary chrome look to a vintage antique bronze finish....adding more charm, without drawing attention to them.
I also scoured Etsy to find some fab art, downloaded the JPEG and sent it off to Etsy for the prints. We ordered the art above the stove in a laminate finish, so that it is wipe-able and we sourced antique frames from our local thrift stores.


We added some charming accents that were already in the home like the brass bell, cutting boards, cookbooks, etc.


I sewed cafe curtains from 100% linen, found at European Textiles in the Ottawa Street Fabric District in Hamilton, Ontario.
(For those of you who like to sew, the fabric district here is fabulous! Plus, the street is riddled with antique markets, eccentric shops and a charming Italian restaurant...I think you will definitely need to stop for a pizza and a #Spritz!)
We added a beautiful, traditional area rug in the 'prepping/cooking' area, that can be easily cleaned, as well as a charming oval sisal in the 'dining area.'

This was such a fun project...working with what we had to save, but also to work with the good bones!
The challenge was to see the beautiful in the busy-ness, to simplify the space and to create focal points to draw the eye.
Now, the focal points are the dining table, a place to gather with friends and family for a good meal...as well as the art over the stove top and the windows over the sink.
This old-world inspired kitchen now boasts a European cafe-like feel with layers of earthy hand-painted colours and natural textures, vintage and Bo-Ho lighting, modern fixtures and fittings, a bright backsplash and cottage-like dishes, glassware and textiles.
There are areas that pop, and areas that recede (all part of my perfect plan!)
The desk area is now simple, tidy and charming and each cabinet is tidy, organized and functional!

There is a space and place for everything.
This large, 2 room kitchen is now tidy, charming and full of personality!
The eye is drawn from area to area, each one that has something beautiful to stop and soak in. The room flows and is balance, with each area complimenting the next, not fighting for attention.

Overall, this was a $9000 project, that looks like a $40000 makeover. The money saved, was greatly appreciated by the home-owners!
The $9000 included all of the paints needed and brushes, lighting, faucet and sink, bench, toaster, dishes, wine glasses, cutlery, napkins, runner, placemats and tea towels, handles and knobs, custom shelving, organizational additions, desk chair, 2 area rugs, bowls and utensils, cookooks, cutting boards, vases and florals, accessories and more. Every little element that added to the cooking and socializing experience!
They appreciated up-cycling their furniture and cabinetry (for environmental, sentimental and budget-friendly reasons.) They felt connected to these styles when they originally built the house...they were attracted to the historical look and feel (early American) of the raised panel doors and Windsor chairs.
By altering the colours and finishes, we were able to 'update' the look, while still honouring the charm and traditionalism of the original design.
We purposely kept this kitchen in neutral colours, working with white, grey and woods, this part of the home is now timeless, and will serve them well for many, many years to come.

Enjoy our video of the new space and please feel free to comment!

For more inspiration, follow our YouTube Channel by clicking HERE.
Thank you for reading!
Wishing you all things that bring you joy!
xo
For more inspiration and for more information on our Interior Decorating Services including In-Home and Virtual Design Consultations, Painting, Shopping, Staging, Home Organization and Vacation Property Makeovers, visit:

